


Destiny 2 Shadowkeep has us back on the grind, and one set of objectives tasks players to find Dead Ghosts belonging to Eris Morn’s former Guardian friends. Here’s how to find all nine.
To actually claim a Dead Ghost, you’ll need to find a Lost Ghost Trace, which tend to drop from events like Moon Patrols, Moon chests and Moon Public Events. With a Trace in hand, you can exchange it for a quest to hunt down one Dead Ghost from Eris Morn herself. Once ‘activated’ the Ghosts will shine in the environment, especially when you’re close to them.
Thre are 9 Dead Ghosts in total and they’re all detailed below.
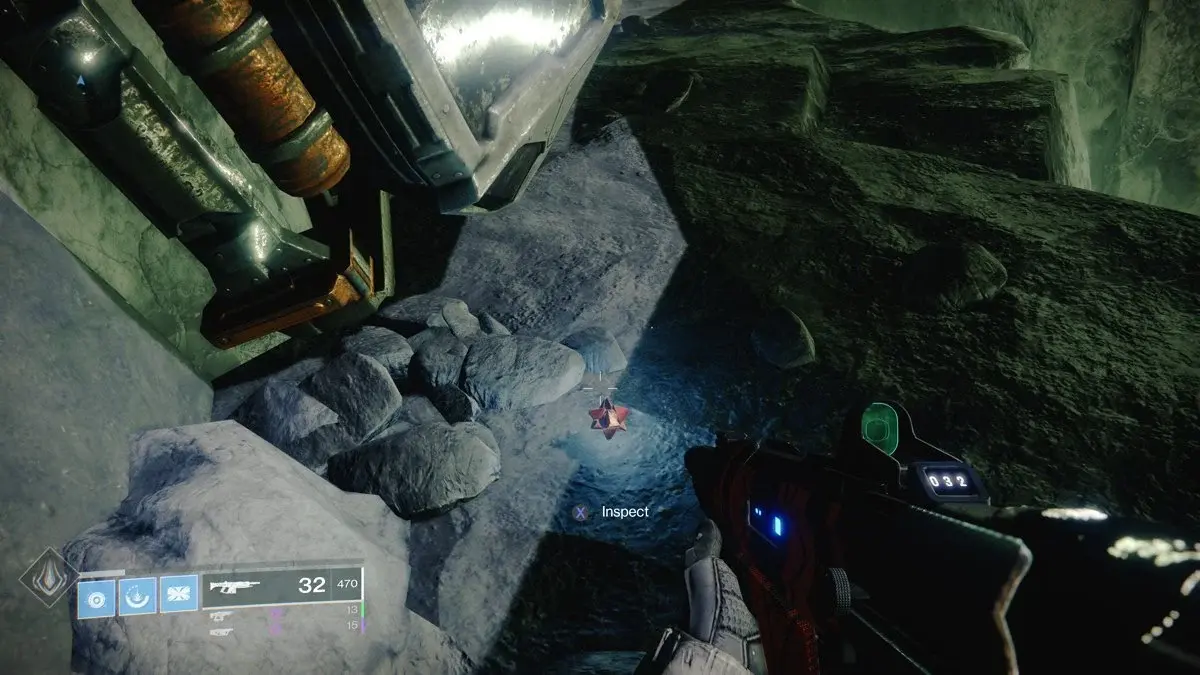
Archer’s Line (Echo of the Great Disaster)
Spawn in near Eris Morn and book it to the left — look for a giant crack in the surface and follow it until it opens on to a big chasm. Look to a small cliff to find the ghost below.
The Ghost found here belonged to Gunnvor.
The World’s Grave (First Crota Team’s Fallen)
Head into the Temple of Crota and down into The World’s Grave. After going for quiet a bit, The World’s Grave location will display as a pop up on your screen. In the little arena room, go right (not forward into a dark tunnel). From there, jump up to the top level of an area shortly afterward and look to a small room off to the left.
The Ghost found here belonged to Sai Mota.
Gatehouse (The Greatest Sacrifice)
Go through the Hellmouth into the Gatehouse. Continue in a linear fashion and hug the right wall as you do so; you’ll come across it pretty quickly.
The Ghost found here belongs to none other than Eris Morn.
Anchor of Light (A Futile Search)
This one’s in the Anchor of Light location, inside the round building. Head towards the back and you’ll find it quickly.
Those Ghost found here is known as the Lonesome Ghost. Who did it belong to?
Circle of Bones (Together Forever)
You’ll find this Ghost in the Circle of Bones location, accessible underneath the Hellmouth.
Look for an arena in the south and you’ll find the Ghost next to a pillar.
The Ghost here belonged to Eriana-3.
Shrine of Oryx (Adonna’s Quest)
This one’s accessible off Archer’s Line, inside the Shrine of Oryx. Pass through the circular tunnel to get there (and the Jade Rabbit there) and continue onto the area where you’ve battled in a Strike previously. Look inside a room in the spire-like structure there.
The Ghost here belonged to Gimble-4.
Summoning Pits (A True Believer)
Head to the Summoning Pits, accessible from the Hellmouth. Once you enter, head to the right and all the way up — this is behind a pillar.
This Ghost belonged to none other than Toland.
Hellmouth (Misplaced Trust)
Head into the Hellmouth and look between two stairwells. It’s pretty early on in.
The Ghost here belonged to Vell Tarowe.
Lunar Battlegrounds (Dark Dreams)
The final Ghost is in the Lunar Battlegrounds area, accessible from Sorrow’s Harbor. Head down into the area, past a couple bridges and continue on until you reach a platform with Wizard and Acolyte. It’s on the ground just past that.
This final Ghost belonged to Vyhar.
Collecting each Ghost will also unlock and Triumph and Lore entry… though on Lore entry is currently (presumably) unattainable. A tenth Ghost, perhaps? We’ll keep you posted.
Destiny 2 is currently available on Windows PC, Xbox One and PS4.
This article may contain affiliate links, meaning we could earn a small commission if you click-through and make a purchase. Stevivor is an independent outlet and our journalism is in no way influenced by any advertiser or commercial initiative.
