


The Last of Us Part 2 is out now and has a bunch of collectibles to find across a multitude of chapters. This guide will help you find each and every one: Trading Cards, Coins, Workbenches, Safes, Journal Entries and Artefacts.
Spoilers lie ahead in terms of chapter names and collectible locations. The videos below will show you when each chapter starts but tries to avoid story-based spoilers wherever possible.
If you don’t want specific help finding the collectibles but want an idea of how many are hidden across each chapter, refer to our The Last of Us Part 2 collectibles count here.
You can always use a chapter select once you’re finished the game, so don’t worry too much if you’ve not gathered everything in one go. As soon as a collectible is picked up, it’s counted against your record. Replaying chapters doesn’t disappear any of the collectibles you’ve already grabbed, though restarting checkpoints/encounters won’t place the items back in the world. Make sure to keep your completed save so you can reload it and check your progress if need be. Back that save up too… because I might have accidentally deleted it like five times over in the hunt for all these.
Got all that? Then let’s go!
Seattle Day 1 | Seattle Day 2 | Seattle Day 3 | Santa Barbara
The Last of Us Part 2 Jackson collectibles
Waking Up collectibles
- Trading Card 1/2: Seismicayla (0:16) – Look to the left of a blue building while following Jesse to the pub.
- Artefact 1/1: Volunteer Request (0:33) – Look to the right of the pub entrance; this is in a little alcove off to the side.
- Trading Card 2/2: The Keene Twins (0:49) – After the pub cutscene, turn around and look on top of a barrel.
The Overlook collectibles
- Artefact 1/1: [Unnamed] (0:13) – After crawling under a house (and shooting an infected while crawling), head into the house to grab this.
Patrol collectibles
- Journal Entry 1/2 (0:14) – After a conversation with Dina at a lookout point, this will pop up.
- Artefact 1/6: A Note to Santa (0:29) – This is in the upper floor of the next grouping of buildings you approach.
- Trading Card 1/2: Tesseracter (0:58) – Dina will find this one for you in the upper floor of the same group of buildings if you don’t get to it first.
- Artefact 2/6: Supermarket Apology (1:26) – Look into the truck backed into the supermarket before you continue on.
- Artefact 3/6: Good Boy Combo (1:49) – This is in the spore-filled area of the supermarket, in a room with the safe.
- Safe 1/1: 07-20-13 (2:14) – This is in the same room as the last document. The code is on a nearby billboard.
- Artefact 4/6: Eugene’s Firefly Pendant (2:48) – This comes automatically with play in the library; cannot be missed.
- Journal Entry 2/2 (3:12) – After the pendant, head into the children’s section and look to the right, at a giraffe.
- Trading Card 2/2: Laurent Foucault, CEO SPARK (3:31) – Head left from the journal entry and look for this with some comics.
- Artefact 5/6: Eugene’s Ultimatum (3:48) – This is to the left of Eugene’s bed.
- Artefact 6/6: Photo of Eugene and Tommy (4:25) – This is behind Eugene’s bed, on a desk.
- Workbench 1/1 (4:52) – Practically part of the story; you’ll get this as you turn on the generator.
Packing Up collectibles
- Journal Entry 1/2: (0:13) – This is automatically in your journal as you start.
- Journal Entry 2/2: (0:22) – This is upstairs in Joel’s house; look at his guitar.
- Artefact 1/1: Joel’s Watch (0:36) – This is part of the story and required to continue.
The Last of Us Part 2 Seattle Day 1 (Ellie) collectibles
The Tunnels | The Theatre | The Birthday Gift
The Gate collectibles
- Trading Card 1/4: Motivator (0:13): Dina will mention that she sees cars; from there, look inside the nearby bus stop.
- Trading Card 2/4: The Starfire Kids (0:32): Head down the nearby highway and look for a construction site on the left. This is in the trailer on the bulletin board.
- Artefact 1/6: Map of Seattle (0:55): In the same trailer in a desk drawer.
- Artefact 2/6: Infected Infographic (1:25): Once you get to the gate, this is on the desk of one of the FEDRA mobile bases.
- Artefact 3/6: Refugee Note (1:51): This is in the other FEDRA mobile base.
- Journal Entry 1/1 (2:17): This is the graffiti on the large gate you need to go through to continue on.
- Trading Card 3/4: Chessmaster (2:36): After you climb up the gate’s wall, stop before you use the ladder to go back down. Look to the left, head up that latter and this is in the guard tower.
- Artefact 4/6: Isaac’s Orders (3:13): In the same guard tower, behind the card.
- Artefact 5/6: Checkpoint Gate Codes (3:31): This is required to continue on and is found in a FEDRA mobile base desk drawer.
- Artefact 6/6: Rooftop Note (3:57): Before riding away use the generator power cable and throw it over the FEDRA mobile base nearest to the generator. Use it to climb up; this is on the lawn chair.
- Trading Card 4/4: Oozer (4:41): Beside the last artefact.
Downtown collectibles
First, you’ll find this map helpful — it will also highlight each and every area of the chapter, awarding you a Trophy when you visit them all.
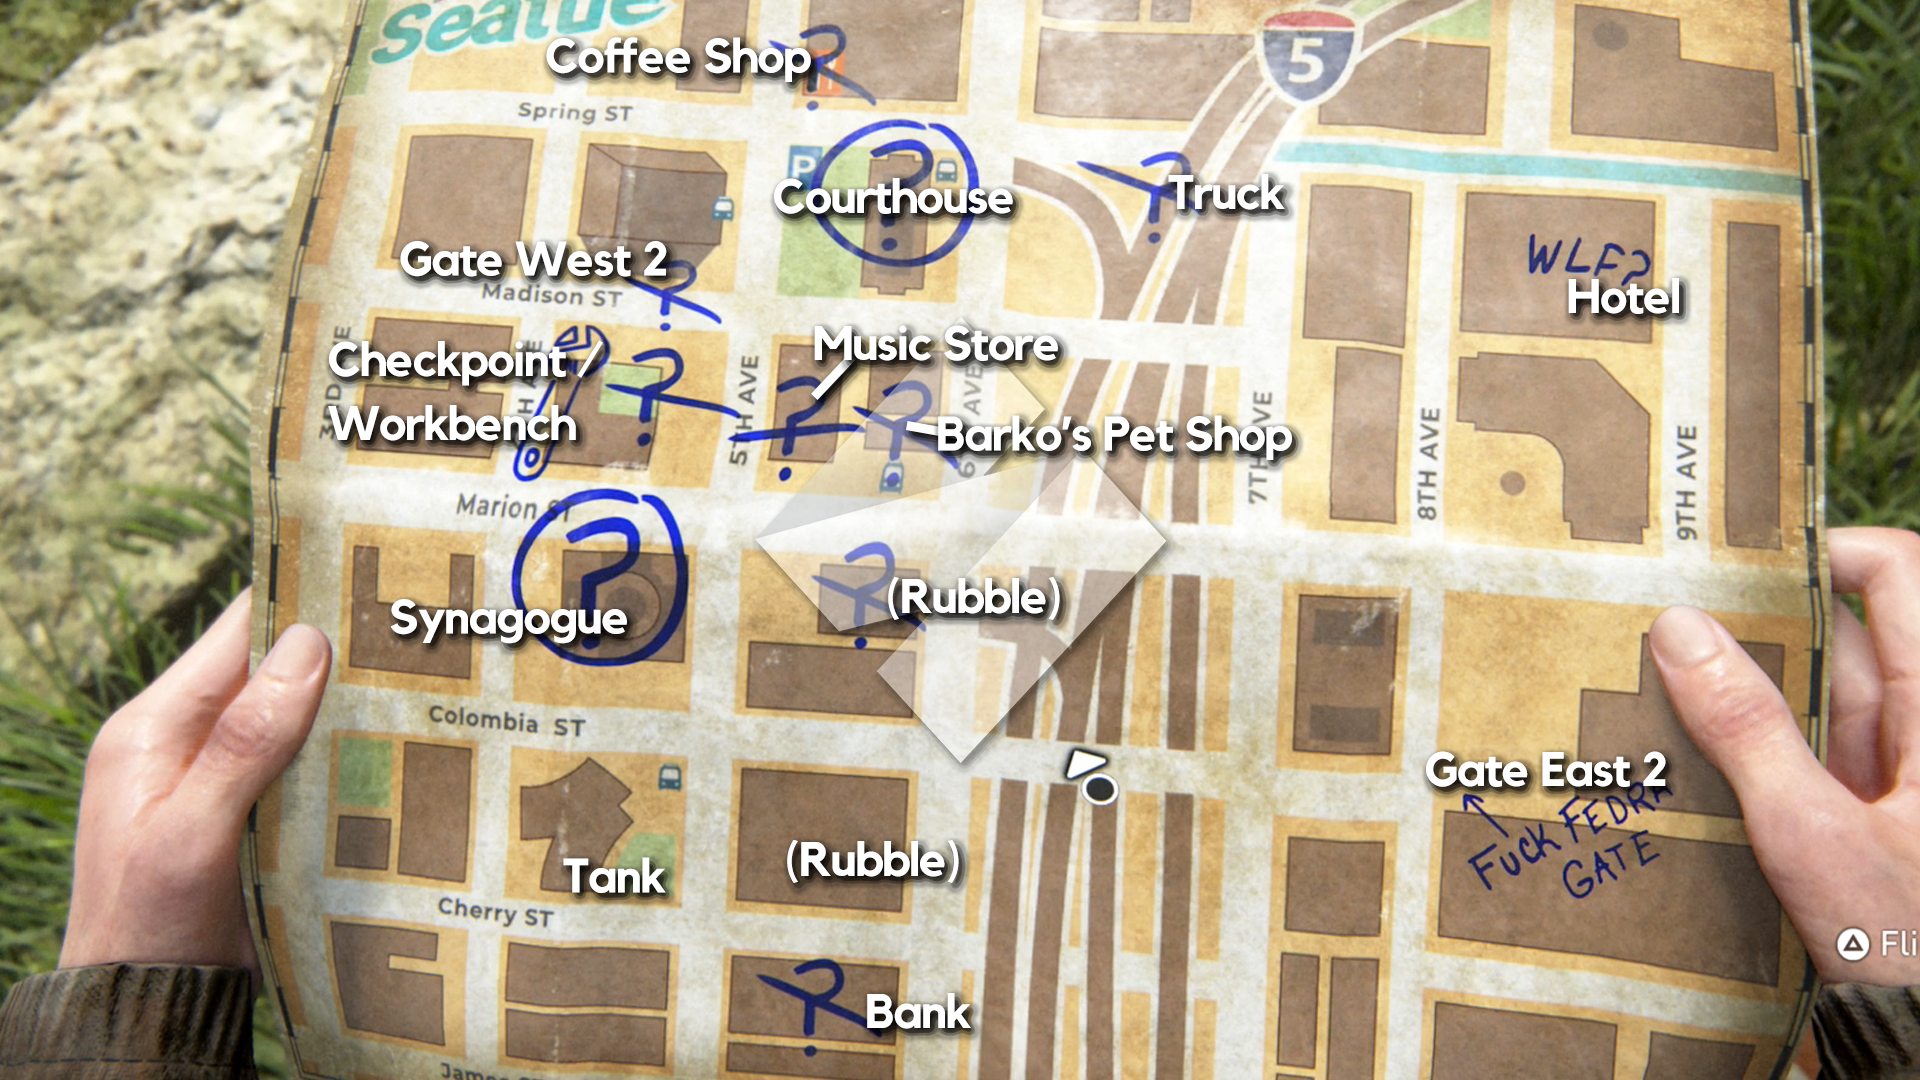
Got that? Good. On to the collectibles.
- Artefact 1/18: FEDRA Census Document (0:48): At Gate East 2.
- Artefact 2/18: Bank Heist Plans (1:09): Inside the bank, beside the safe.
- Safe 1/3: 60-23-06 (1:41) – Beside the last document in the bank.
- Artefact 3/18: Bank Robber Letter (2:21) – Inside the bank safe.
- Artefact 4/18: Antique Ring (2:54) – Also inside the bank safe.
- Artefact 5/18: Cache Hunter Note (3:17) – In some rubble near the bank.
- Artefact 6/18: Note to Informant (3:46) – In the truck with “Fascists” painted on the side.
- Trading Card 1/5: Doctor Uckmann (4:29) – In more rubble closest to Barko’s; you’ll need to climb up and over to get to it.
- Artefact 7/18: Letter from Isaac (5:07): In a messenger bag near the tank.
- Trading Card 2/5: Das Wort (5:39) – In the Music Store, look inside a desk drawer.
- Artefact 8/18: Street Drawing (6:02) – In a guard tower next to the Music Store.
- Journal Entry 1/2 (6:41) – The same place as the street drawing.
- Workbench 1/1 (7:01) – In the checkpoint near the music store/guard tower.
- Artefact 9/18: WLF Community Supply Chest Note (7:22) – North of the music store, there are stairs leading to a dead end balcony. This is in a messenger bag.
- Safe 2/3: 04-51 (8:11) – This is at Gate West 2.
- Trading Card 3/5: Flo (8:50) – This is inside the Gate West 2 safe.
- Artefact 10/18: Pet Store Key (9:05) – This is in the back of the Coffee Shop. Be ready for a fight.
- Trading Card 4/5: Big Blue (9:37) – This is in a drawer inside the Coffee Shop.
- Artefact 11/18: WLF Safe House Supply Note (9:56) – This is on the counter at the Coffee Shop.
- Artefact 12/18: Join WLF note (and recipe and gear) (10:24) – These are all inside Barko’s now that you have the key to head in.
- Artefact 13/18: Emergency Protocols Memo (11:30) – This is in a guard tower before entering the Synagogue.
- Artefact 14/18: Rabbi Saunders’ Letter AND Journal Entry 2/2 (11:31) – Inside the Synagogue; interact with all items and speak to Dina whenever possible?
- Artefact 15/18: Plea to a Friend Letter (13:23) – Inside the Courthouse, look for a corpse near elevators and the items detailed below.
- Training Manual: Survival (13:50) – Break a window and head into the room beside the corpse. This is on a bookshelf.
- Artefact 16/18: List of Known WLF Agitators (14:14) – In the same room as the last, head to the other end and look in a filing cabinet.
- Safe 3/3: 86-07-22 (14:37) – Back near the Training Manual. The code was on the whiteboard near the last artefact.
- Artefact 17/18: Lt Torres’ Final Memorandum (15:25) – Pull the weapon pinning the corpse against the whiteboard with the code. It’ll fall out of the corpse.
- Artefact 18/18: WLF Recruiter Journal (15:51) – This is in the second floor of the hotel. Look in a drawer.
- Trading Card 5/5: Know It All (16:18) – Behind the last artefact, this is in a drawer between two beds.
Eastbrook Elementary collectibles
- Artefacts 1-3/3: Leah’s Note, Leah’s Photograph, Isaac’s Mandate (0:09) – You have two already; the third is on a table after you leave a rooftop.
- Trading Card 1/1: Cardio (0:53): Once you jump from the rooftops into an apartment, vault over a couch on the right and continue into a bedroom. This is in a bedside table.
Capitol Hill collectibles
- Trading Card 1/6: Kinnard, Esq (0:09): In the ground floor of a blue house off the school with a 3 on its front.
- Artefact 1/7: Chevy’s Apology (0:33): In the upstairs bedroom of a brick house with a 6 on its front and near a pool.
- Trading Card 2/6: Rockafella (1:04): When you get to the inn/motel, head around the back left and enter through the first window.
- Artefact 2/7: Raul’s Olive Branch (1:27): Off to the right of the inn/motel, you’ll be able to pull a green rubbish container to an apartment building to gain access. Check the kitchen.
- Workbench 1/2 (2:16): This is in the garage of the nearby service station.
- Training Manual: Stealth (2:32): This is in the coffee shop area of the LGBTQ+ bookstore.
- Artefact 3/7: Rebecca’s Tip Off (3:07): This is on the back wall of the same coffee shop.
- Trading Card 3/6: Doctor Stem (3:23): This is in the backroom of the same coffee shop/bookstore.
- Trading Card 4/6: Sergeant Frost (3:44): This is in the back of the grocery store, inside a locker.
- Trading Card 5/6: Candelabra (4:13): When you get to the first area with tripwires, check the back-left of the liquour store on your left.
- Artefact 4/7: Tower Doodles (4:33): Once you get past that tripwire section, look to the right and head up the tower’s ladder before you head down the valley.
- Artefact 5/7: Raul’s Account (5:10): Once you get to the other side of the valley, look in the back of the large military truck nearby.
- Artefact 6/7: Fran’s Refusal (5:28): This is on the bulletin board inside the martial arts dojo when you get to another tripwire area.
- Workbench 2/2 (5:54): This is in a side room of the same martial arts dojo.
- Trading Card 6/6: Bizzarebra (6:07): This is in the thrift store to the left of the dojo.
- Artefact 7/7: Thrift Store Reminder (6:27): This is in the back room of the same thrift store.
- Safe 1/1: 55-01-33 (6:50): This is near the last artefact.
Channel 13 collectibles
- Trading Card 1/1: Kimimela (0:14): Once you get up to the first level of executive offices, check the back office for this.
- Artefact 1/1: Dad’s Pep Talk (0:32): On the second floor of offices, you’ll find this on a couch in the office to the right of the hole in the wall.
The Tunnels collectibles
- Artefact 1/5: Subway Note (0:09): After combat sequence, you’ll enter another set of trains. This is in the back of the second carriage.
- Trading Card 1/3: The Imp (0:33): Continuing on, you’ll have to go through a door with a red light shining from it. Before doing that, look underneath the train to the left.
- Workbench 1/1 (0:49): This is in a room off to the side of the rope puzzle.
- Journal Entry 1/1 (1:03): This is after defeating the Shamblers. Make sure to inspect bodies!
- Trading Card 2/3: Dr Daniela Star (1:19): Once you are running through a corridor, look for a sign that points to Station Access. From there, you’ll find a room off to the right hand side. Head to the back, crawl under the desk and loop around to get into the locked cage. This is inside.
- Artefact 2/5: Whittled Statue (1:56): From the last card, head through into the next room; this is beside a microwave.
- Artefact 3/5: Locker Room Note (2:22): On a table near the last artefact.
- Artefact 4/5: Soda Can Note (2:45): In the soft drink vending machine near the last artefact.
- Locked door: 15243 (3:07): This is directly behind the last artefact.
- Trading Card 3/3: Bastet (3:38): In the middle of the train maze, look for a small opening at the bottom of one of the wrecks. Climb through and find this card on a piece of luggage.
- Artefact 5/5: Subway Station Note (4:06): As you climb up the train maze, you’ll pass through one last train. Before heading back down, look to the wall on the right.
The Theatre collectibles
- Trading Card 1/2: Mortem (0:09): Once you’re in the theatre, head to the very back of the room you’re in; this is in a glass case at the back.
- Artefact 1/4: Programme for Cassandra (0:32): On a green crate to the left of the last card.
- Artefact 2/4: Lone FEDRA Soldier Journal #1 (0:50): Head upstairs, loop around into the room on the left and look on a table.
- Trading Card 2/2: Beyond (1:10): This is on the second floor — head all the way around the main corridor and check the floor once at a dead end.
- Artefact 3/4: Lone FEDRA Soldier Journal #2 (1:27): This is in the control room on top of the radio. Part of the story.
- Artefact 4/4: The Sick Habit Flyer / Set List (1:51): This is right ahead of the theatre’s large red curtain.
The Birthday Gift collectibles
- Journal Entry 1/2 (0:09): Before heading into the museum, check the large T-Rex outside.
- Trading Card 1/2: The Nighthawk (0:27): On the lower level of the dino exhibit, check on top of a bench.
- Journal Entry 2/2 (0:38): This is in the centre benches in the space exhibit.
- Trading Card 2/2: Saura (0:56): Once you cross into the second half of the museum, this is under a bench.
- Artefact 1/1: Suicide Note (1:07): This is on a corpse as you continue on.
The Last of Us Part 2 Seattle Day 2 (Ellie) collectibles
Hillcrest collectibles
- Trading Card 1/5: Wachumero (0:09): Right from the start, turn around, jump down and look in the truck.
- Workbench 1/2 (0:28): Head into the clothing store on the right, crawl through the gap to head to the basement and it’ll be waiting for you there.
- Artefact 1/10: Boris’ Daughter’s Drawing (0:53): In the same basement as the workbench.
- Artefact 2/10: Join WLF Note (1:12): In the backroom of the laundromat found in the same strip of shops as the other items so far.
- Artefact 3/10: Need a Plan Note (1:33): Head to the next section (you’ll spot WLF members when doing so) and then head left and around. This is in the single shop there.
- Trading Card 2/5: Sahir the Sorcerer (2:04): In the same shop as the last item.
- Artefact 4/10: Yolanda’s Note (2:16): Head back the direction you’re supposed to go, and look into the bookshop just before the hole in the road.
- Journal Entry 1/1 (2:41): Look to the big WLF flag beside the bookstore.
- Workbench 2/2 (2:58): You’ll drop into the bike repair shop as part of progression. This is in there.
- Trading Card 3/5: Naledi the Youthful (3:15): In the back corner of the workbench room. Check inside a bike’s wheelspokes.
- Artefact 5/10: Condolence Note (3:28): Head into the back room beside the last trading card location.
- Training Manual: Precision (3:48): Head into the liquor store, then through a Shambler nest and pop up in a toy store. This is on the desk.
- Artefact 6/10: Note in Hillcrest Tattoo Parlour (4:39): Head into the tattoo shop and look in the back room.
- Safe 1/1: 30-82-65 (and gear) (5:02): Check behind the tattoo shop. Move the bin that’s blocking the door and be prepared for a fight.
- Artefact 7/10: Turn in Boris Note (7:16): Head into the back room of the pet store and check on a shelf.
- Artefact 8/10: Dale’s Combo (7:41): Head through the tavern and look at the wall as you enter the kitchen.
- Trading Card 4/5: Brainstorm (8:05): Head past a combat encounter and drop into the back yard of a house. This is in the child’s play house along the left.
- Artefact 9/10: Rosemont’s Flyer (8:22): Head into the house and take a look for this in the kitchen on the left.
- Artefact 10/10: Boris’ Confession (8:41): This is on the coffee table in the same house’s living room.
- Trading Card 5/5: Reverb (8:59): After getting the bow and arrow and entering a combat engagement, look for a house in a tent being fumigated. The card is under a bed in the top floor of the house across the street from the one in a tent.
Finding Strings collectibles
- Journal Entry 1/1 (0:00): As soon as the flashback starts, look to the vista on your right.
- Trading Card 1/1: The Austringer (0:17): You’ll get to a hole in the road that means you need to cut through the hotel. Check the other side of the car in the hole before you continue on.
- Artefact 1/1: Tara’s Invitation (0:33): In the hotel, Joel will direct your attention to the corpse of an infected. This is in the room just beside it.
The Seraphites collectibles
- Trading Card 1/6: Randy Styles (0:09): On a shelf in the convenience store you need to pass through to continue on.
- Artefact 1/7: WLF Target List (0:26): As you continue, you’ll see a bunch of infected in a restaurant on your left. Kill the enemies to have one drop this.
- Journal Entry 1/3 (1:03): When you enter the Conference Centre to the right of the restaurant look for a piece of graffiti on the wall.
- Trading Card 2/6: Shift (1:23): You’ll need to use the rope to make a climbable way to a room on the second floor of the Convention Centre. This is in there.
- Artefact 2/7: Last Letter to Husband (2:53): In the same room as the last card.
- Trading Card 3/6: Star Sign (3:11): Continue on and look for an apartment building on your left (you can get in via the second floor or the basement). This is in a desk drawer up top.
- Safe 1/2: 10-08-83 (3:43): This is just beside the last artefact, in a closet.
- Artefact 3/7: Evacuation Letter (4:07): This is on the kitchen table in the same apartment as the last two items.
- Workbench 1/2 (4:36): Head out of that apartment and into the next one adjacent it. It’s in the back.
- Training Manual: Explosives (4:56): After that workbench surprise, check the room the attackers came from.
- Artefact 4/7: WLF Deserter Letter (5:23): This is in the same room as the training manual.
- Journal Entry 2/3 (5:41): Part of the story, really — you’ll make this entry as you climb up to see the Convention Centre and the Hospital behind it.
- Trading Card 4/6: Arch-Enemy (5:48): Head to the ground floor of the Convention Centre and then climb up through a small window into an office area.
- Journal Entry 3/3 (6:13): After a combat encounter in a park, this is on the side of bus stop (and a corpse) as you leave the park.
- Trading Card 5/6: Doppelganger (6:31): This is in a corner of the hotel’s second floor.
- Artefact 5/7: Dying Husband’s Plea (6:45): When you get to a fire escape of a red brick building, head upstairs and in through a window. This is on a corpse.
- Trading Card 6/6: Bhat M’andarr (7:08): This is just inside the Weston’s pharmacy to the left of the body of water you need to cross.
- Artefact 6/7: Pharmacy Note (7:22): Oddly enough, this is in the same pharmacy as the last card, underneath the cash register.
- Safe 2/2: 38-55-23 (7:43): In the same pharmacy, find the hole in the wall and crawl through it.
- Workbench 2/2 (8:19): In the same back room as the last safe.
- Artefact 7/7: Hospital Supply List (8:31): Once you get to the hospital, check in the Waiting Room on the second floor.
The Last of Us Part 2 Seattle Day 3 (Ellie) collectibles
Road to the Aquarium collectibles
- Trading Card 1/4: Esquire (0:00): Right when you start, look to the left of the red curtain before going through.
- Workbench 1/2 (0:09): Before helping Jesse move a shelving unit to continue, head to the back of the building you’re in and climb through an opening into another room.
- Trading Card 2/4: Tormentra (0:33): In the same room as the workbench.
- Artefact 1/3: Garage Note (0:45): As you continue on, look for a parking garage on the left-hand side of the path. This is at the end of a combat sequence.
- Trading Card 3/4: Tanager (1:27): Once you jump down into the bookstore, crawl underneath the slab of concrete you landed on.
- Journal Entry 1/1 (1:55): Look for a mushroom in the children’s section of the bookstore.
- Artefact 2/3: Bookstore Note (2:15): This is directly behind the journal entry.
- Artefact 3/3: Textile Note (2:30): After a combat encounter, this is up in the second floor of the building a sniper was shooting from.
- Workbench 2/2 (3:00): Continue on up the muddy path the department store and access this on a higher floor.
- Trading Card 4/4: Tatuaje (3:23): Before moving a barricade from a door with Jesse, turn around and look in the corner of the rubbled area.
The Flooded City collectibles
- Trading Card 1/2: Seff-L’Ho’Phad (0:09): Once you get to the first puzzle area, look in the room at the far wall (from the closed gate). It’s here in a desk.
- Journal Entry 1/1 (0:51): Head up the stairs on the left-hand side of the puzzle area and interact with the windows in the next main room.
- Artefact 1/6: Stash Note (1:13): Check the corpse in the corner of the same room as the journal entry (and drag the garbage container her to climb up for supplies!).
- Safe 1/1: 70-12-64 (1:29): Crawl under the gap the garbage container was blocking and drop into the area with the safe.
- Workbench 1/2 (2:13): Once you’ve opened the door and are back in your boat, continue on a bit and look for a little shop on the left.
- Artefact 2/6: Shambler Note (2:34): Proceed around or through the building to the right of the workbench shop and then look for a hotel. This is in the back corner.
- Artefact 3/6: Sniper’s Note (2:59): Once you get to the big Seraphite combat encounter, this is in the trains that are to the left of the Seraphite camp.
- Artefact 4/6: Encampment Note (4:19): This is inside the Seraphite camp itself.
- Artefact 5/6: Arcade Flyer (4:57): This is on the ground floor of the Barcade arcade.
- Workbench 2/2 (5:16): This is on the second level of the arcade.
- Trading Card 2/2: Khazakh Bright (5:27): Once you’ve dealt with the arcade’s boss, this is on a shelf in the arcade prize room.
- Artefact 6/6: Arcade Note (5:54): This is on the second floor of the arcade, pinned to a wall in a LAN area.
Infiltration collectibles
- Journal Entry 1/1 (0:09): Once you get to a vet’s operating room, look for a nearby room being used as a camp area. Search the duffel bag in the back of the room for this.
The Last of Us Part 2 The Park collectibles
Tracking Lesson collectibles
- Artefact 1/3: Thank You Card from Mel (0:10): You start with this one.
- Artefact 2/3: Owen’s Drawing of Abby (0:17): You also start with this one! Bonus.
- Artefact 3/3: Zoo Holiday Brochure (0:30): Once you get to the Zoo, look for the gazebo off to the right. This is there.
- Coin 1/1: Virginia (0:52): This is part of the story; you’ll collect this as you interact with a garbage container to progress.
The Last of Us Part 2 Seattle Day 1 (Abby) collectibles
The Forest | The Coast
The Stadium collectibles
- Coin 1/4: Alaska (0:09): After getting your backpack, leave your room and keep to the left before heading downstairs.
- Coin 2/4: Maine (0:25): After passing through a laundry area, check the bench in the area just past it before continuing down.
- Coin 3/4: New Jersey (0:41): This is behind the lady who greets you after you’ve collected Alice.
- Coin 4/4: Vermont (1:02): This is in the back corner of the room past the shooting range.
On Foot collectibles
- Coin 1/4: Kentucky (0:09): As you start the chapter, head to the right and look on a nearby table.
- Coin 2/4: Massachusetts (0:20): This is on a cashier’s table in the back corner of the garden centre.
- Workbench 1/1 (0:35): This is in the boat workshop that you’ll get to.
- Coin 3/4: Ohio (0:52): Once Mel unlocks a door for you, grab the nearby ladder and use it to climb up rather than first over to the boat.
- Training Manual: Covert Ops (1:12): This is in the boat as you travel across with the ladder.
- Artefact 1/1: WLF Gun Cache Note (1:27): Once outside, this is in the trailer sitting in the middle. Break a window to get in.
- Coin 4/4: Indiana (2:14): This is in the same trailer as the artefact.
- Safe 1/1: 17-38-07 (and Hunting Pistol) (2:24): This is in the room just beyond the trailer; squeeze through a crack in the wall to get in.
The Forward Base collectibles
- Coin 1/3: California (0:09): When you regain control of Abby, look to the back right corner before entering the base.
- Coin 2/3: New Mexico (0:28): As you enter the base, hang a left and look behind the group of people standing near portaloos (eww).
- Workbench 1/1 (0:48): This is in the same area as the second coin.
- Coin 3/3: South Carolina (1:05): Once you pass through the morgue and enter another building, look to the left of people playing cards.
- Artefact 1/1: WLF Interrogator Letter (1:18): This is on a side table in the same room.
Hostile Territory collectibles
- Training Manual: Close Quarters (0:09): As you start, you’ll quickly head towards a fabrics shop. Turn around, jump through the broken window and grab this on a shelf.
- Artefact 1/12: Scar’s Suicide Note (0:31): This is in the same room as the training manual, on a corpse.
- Coin 1/1: North Dakota (0:46): You’ll climb up an RV to get into a building. This is in the first room you’ll enter, inside a TV stand.
- Artefact 2/12: Plea to Seraphite Prophet (0:58): You’ll need to go through the last shop on the left-hand side when you get to a strip of shops, then jump over to the other side of shops. This is upstairs after you jump over, on a corpse.
- Artefact 3/12: Jasmine Bakery Safe (1:47): Once you get the last artefact, head back downstairs and turn right into the buildings. This should be right ahead of you.
- Artefact 4/12: Strange Relic (2:10): This is right around the corner from the last artefact.
- Double-barrel shotgun (2:29): Head down into the shop that you can’t get into from the street and look behind the counter.
- Safe 1/1: 68-96-89 (2:42): This is in the first shop on the left-hand side.
- Artefact 5/12: Seraphite Prayer to Prophet – Peace (3:12): The next six artefacts are in and around the Seraphite shrine that you’ll run into.
- Artefacts 6/12 and 7/12: Seraphite Prayer to Prophet – Steed and Respect (3:46): Part of the document group at the shrine.
- Artefact 8/12: Prayer for Victory (4:11): Part of the document group at the shrine.
- Artefact 9/12: Seraphite Prayer to Prophet – Prosperity (4:25): Part of the document group at the shrine.
- Artefact 10/12: Seraphite Prayer to Prophet – Pairing (4:45): Part of the document group at the shrine.
- Artefact 11/12: WLF Soldier Meets Prophet Letter (4:58): This is in the nail salon to the right of the shrine.
- Long Gun Holster (5:19): This is in the backroom of the same shop as the last artefact.
- Workbench 1/1 (5:34): This is in the back of the Seraphite camp you come across.
- Artefact 12/12: Letter from Seraphite Father to Son (5:51): This is directly behind the workbench.
The Forest collectibles
- Workbench 1/1 (0:09): This is in the corner of a garage.
- Artefact 1/1: Failed Truce (0:33): This is the next room from the workbench.
- Training Manual: Firearms (0:55): Just in a side room off the room the artefact was in.
The Coast collectibles
- Workbench 1/1 (0:09): Right in front of you when you leave the area with containers and enter a building.
- Short Gun Holster (0:20): Just off in a side office nearby the workbench.
- Coin 1/4 Alabama (0:35): Once you clear the combat area with containers, this is at a dead end on the second story of the bridge/overpass/highway.
- Artefact 1/3: Infirmary Note (0:49): This is in the first room of the ship.
- Crossbow (1:14): You’ll get this as part of the story when you break through a door.
- Artefact 2/3: Mutiny Note (1:33): This is on the opposite side of the corridor from the crossbow.
- Coin 2/4: West Virginia (1:50): Head to the next floor of the ship, hang a right, then another right at the end of that corridor. It’s beside teddy bear.
- Safe 1/1: 90-77-01 and Training Manual: Ordinance (2:05): This is at the top back (or aft) of the ship.
- Artefact 3/3: Ferry Log (2:45): This is on the Captain’s corpse on the ship’s bridge.
- Coin 3/4 : Utah (3:12): Head up the ladder from the ship’s bridge and look behind you, behind the Crow’s Nest.
- Coin 4/4: Mississippi (3:33): This is in the fountain in front of the aquarium.
The Last of Us Part 2 Seattle Day 2 (Abby) collectibles
The Shortcut collectibles
- Coin 1/2: Nevada (0:09): This coin is in a Barber Shop. Check near the register.
- Artefact 1/6 and 2/6: Survivor Plea, Amputation Supplies (0:21): The first artefact is already in your inventory. The second is easy to spot as you progress, just beyond a doorway on the second floor of an apartment building you enter off the rapids.
- Artefact 3/6: Neighbour Exchange (0:36): This is near a large whiteboard in an apartment as you progress.
- Safe 1/1: 30-23-04 (0:54): This is directly behind the last artefact, in a bedroom.
- Artefact 4/6: Scavenging List (1:22): This is on a corpse in the Interbay mobile phone (or cell phone) shop.
- Workbench 1/2 (1:40): This is in a corner in the same shop as the last artefact.
- Coin 2/2: Colorado (1:55): This is on an outside ledge of an optometrist.
- Artefact 5/6: Seraphite Truce (2:12): This is in a dilapidated office building.
- Workbench 2/2 (2:29): This is to the right of a ladder to continue onwards; you’ll see it after a striking mural of the Prophet.
- Artefact 6/6: Seraphite Orders (2:41): After an elevator ride, you’ll see this on a wall next to a doorway.
The Descent collectibles
- Coin 1/5: Illinois (0:04): This is to your left, in the pool you’ll see as you start.
- Artefact 1/3: Gym Safe Combo (0:25): This is in the back room of the juice bar, on the same floor as the pool.
- Safe 1/1: 12-18-79 (0:47): This is to the right of the gym, on the same floor as the last two items.
- Artefact 2/3: FEDRA Orders (1:16): After you enter the stairwell, you’ll grab this automatically off the corpse.
- Artefact 3/3: FEDRA Final Note (1:33): This is in the spore-filled area you’re exploring with Lev, right after using a hose to head down the building.
- Flamethrower (1:50): This is after a small balance beam that requires you to crouch through a hole in the wall. You’ll find it on a corpse.
- Coin 2/5: Oregon (2:07): After jumping from one floor to a lower one (and encountering an infected), jump back in the direction you’ve just come from.
- Coin 3/5: Wisconsin (2:33): This is in a vending machine on the left after you squeeze through elevator doors.
- Coin 4/5: Rhode Island (2:50): This is in the bar area of the entertaining area outside the hotel.
- Coin 5/5: Missouri (3:04): Once you get to the hospital, look to the right — this is in the same building Ellie passed through to get to the hospital.
Ground Zero collectibles
- Coin 1/2: Washington (0:09); As you’re walking with Nora, look for a small coffee shop. It’s behind the counter.
- Artefact 1/5: Annex Letter (0:28): This is on the second floor of the hospital — before heading down to floor 1, look for a crawl space on the right. It’s on a corpse.
- Artefact 2/5: Soldier’s Letter (0:53): Looking at the entrance to the Emergency Room, this is in a messenger bag to its right.
- Artefact 3/5: Chapel Note (1:11): The Chapel is in the same area as the entrance to the Emergency Room. Look for this on the pulpit.
- Artefact 4/5: Patient’s Note (1:32): Once in the Emergency Room, look for a room that you can crawl through a broken window to get into.
- Artefact 5/5: Doctor’s Note (1:55): This is in Surgery; enter, head right and vault over a window sill to get to it.
- Workbench 1/1 (2:19): This is beside the generator that you’ll need to turn on to progress.
- Coin 2/2: Hawaii (2:37): Once in the parking garage, look for an operator booth the left. Break the window to grab this.
The Last of Us Part 2 Seattle Day 3 (Abby) collectibles
The Marina collectibles
- Coin 1/2: Kansas (0:09): Turn right directly after you gain control of Abby.
- Coin 2/2: Louisiana (0:21): When you get to Lenora St. station look behind the ramp on the right.
- Artefact 1/1: Marina Note (0:32): This is in the little room on the ground floor of the marina, before you take the ladder.
The Island collectibles
- Coin 1/3: Idaho (0:09): Climb a ladder to get onto an overpass, then look into the open truck directly to your left.
- Artefact 1/4: WLF Scout Journal (0:23): This is near the first coin, on a WLF corpse on the ground.
- Coin 2/3: North Carolina (0:38): Before leaving the overpass road and dropping into a hole, look on the opposite side of the car on the left.
- Artefact 2/4: Venison Distribution Note (0:53): This is on a table in the first set of huts you come across.
- Coin 3/3: Montana (1:15): Before passing through the lumber mill with two lit torches, head into the upper floor of the barn across from it.
- Artefact 3/4: Mournful Prayer Note (1:36): This is in the shrine-style hut.
- Artefact 4/4: Young Seraphite’s Journal (1:59): This is in the hut to the left of the shrine-style hut.
- Workbench 1/1 (2:22): This is in the same hut as the last artefact.
The Escape collectibles
- Coin 1/1: Arkansas (0:09): You’ll squeeze through a door later on the be looking at a brewery truck. Hang left and grab this from behind a shopping cart.
- Workbench 1/1 (0:30): You’ll drop into a small room later on and the workbench will be directly ahead of you.
The Last of Us Part 2 Santa Barbara collectibles
2425 Constance collectibles
- Artefact 1/1: Letter from Daddy (0:10): After fighting infected, look for a green house on the left. Jump in and head to the bathroom.
Pushing Inland collectibles
- Artefact 1/3: Abby’s Note (0:09): This is in the boat you start in.
- Artefact 2/3: Mansion Note (0:28): This is in the garage on a house to the right after you get up to the street.
- Trading Card 1/1: CBB-73 (0:47): This is on the upper floor of the mansion on top of a kid’s desk.
- Workbench 1/1 (1:04): This is downstairs in the mansion’s kitchen.
- Artefact 3/3: Runaway Warning (1:17): On the kitchen bench just beside the workbench.
- Journal Entry 1/1 (1:36): This is the vista of Santa Barbara; automatic.
The Resort collectibles
- Journal Entry 1/1 (0:09): This is graffiti on the side of a blue van.
- Artefact 1/2: Santa Barbara Slave Note (0:29): Before climbing through a hole in the fence, look to the back corner on the left.
- Workbench 1/1 (0:52): This is in the centre of the first encampment area.
- Trading Card 1/1: Sparkthug (1:09): This is in a lit room just beyond the workbench.
- Artefact 2/2: Rattler’s Letter Home (1:27): This is on the upper floor of the mansion area; you can use the large staircase to get near this.
The Last of Us Part 2 is a PS4 exclusive available from today, 19 June.
This article may contain affiliate links, meaning we could earn a small commission if you click-through and make a purchase. Stevivor is an independent outlet and our journalism is in no way influenced by any advertiser or commercial initiative.
