


Recently I rekindled my love with the game Escape Plan. Rather than just replaying the story over and over again I decided to go for some of the trophies. So how does this benefit you? Easy, I took screenshots of the locations of every sign and have included them below for your trophy hunting pleasure. I’ve included the 30 you need for the trophy as well as the four hidden in the DLC (just in case there are a few 100% seekers out there).
You can view how many you have for each level by selecting Start then Section Select from the main menu. Each level’s title screen shows how many stars and signs you’ve collected. Once you collect a sign in a level you don’t need to complete the level for it to register. So, if you’re just playing for the trophy, grab the sign then pause and exit the level for it to save the addition.
Enjoy!
Prison Section 1 – 5 signs | Prison Section 2 – 3 signs | Factory Section 1 – 4 signs | Factory Section 2 – 6 signs | Dump Section 1 – 6 signs | Dump Section 2 – 1 sign | Workshop Section 1 – 4 signs | Workshop Section 2 – 1 sign | Bakuki’s Lair (DLC) – 4 signs
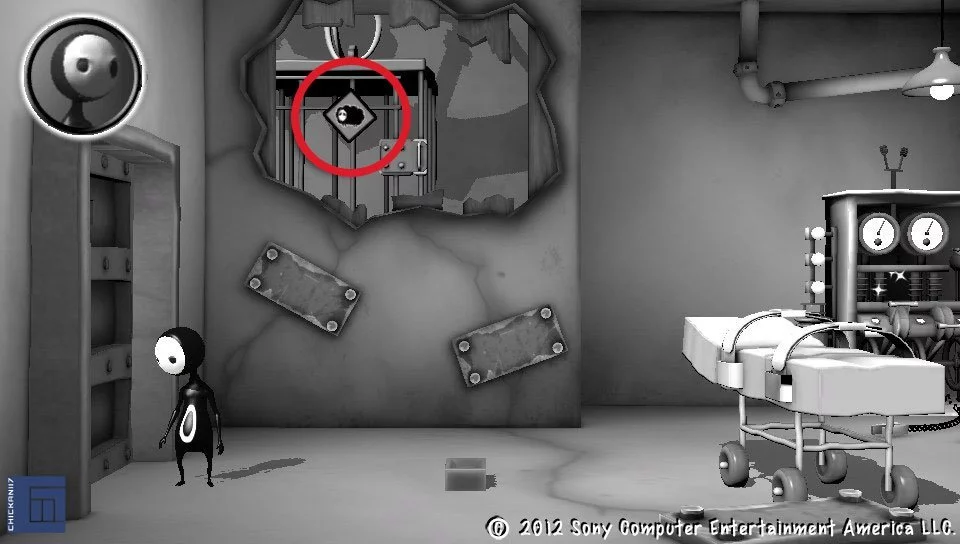
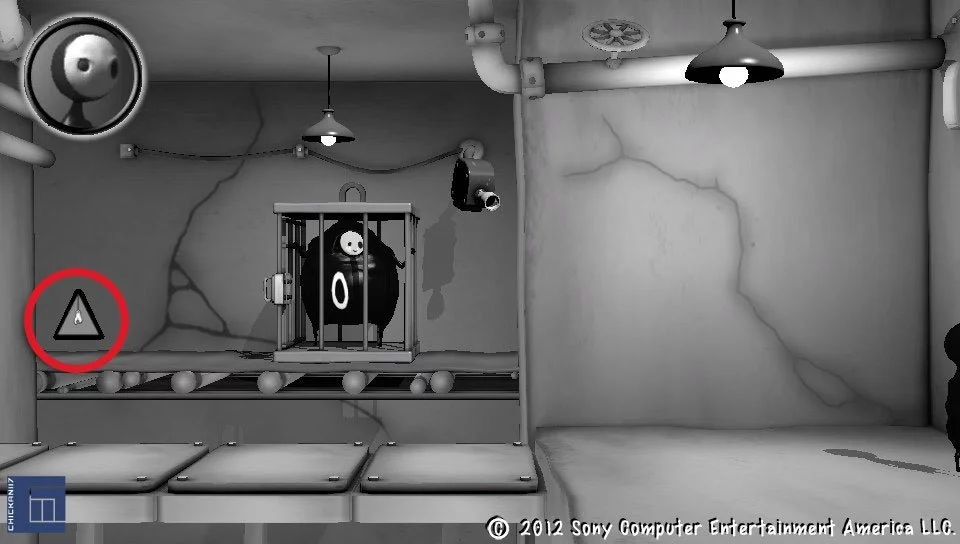
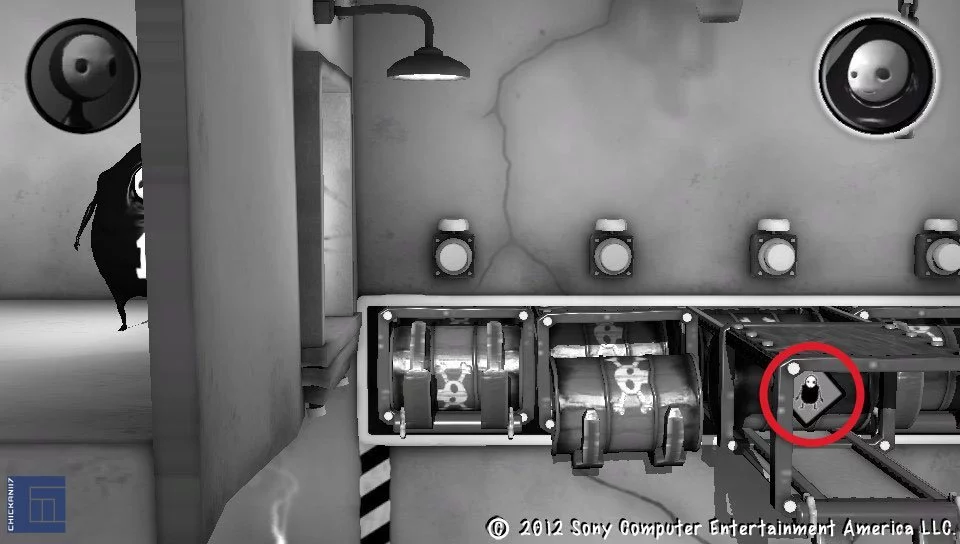
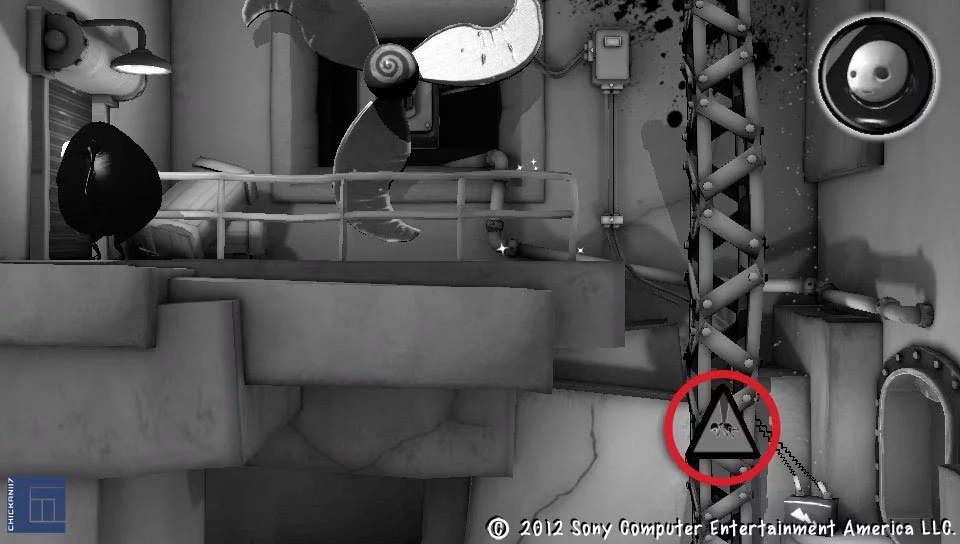
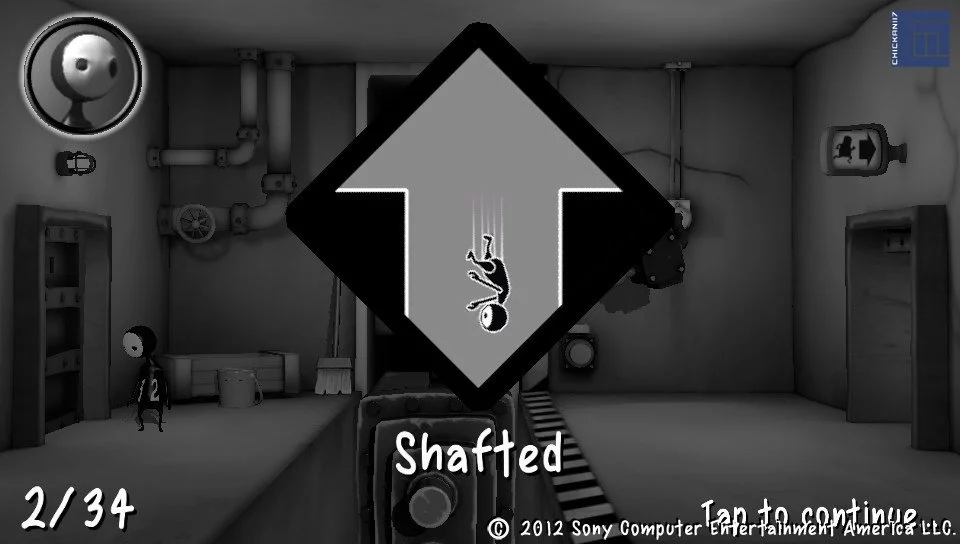
Sign 1 – Level 4 – Tap That
Once the level begins look above Lil to see a hole in the wall. Cages will be carried past this hole and the sign is stuck on the third one.
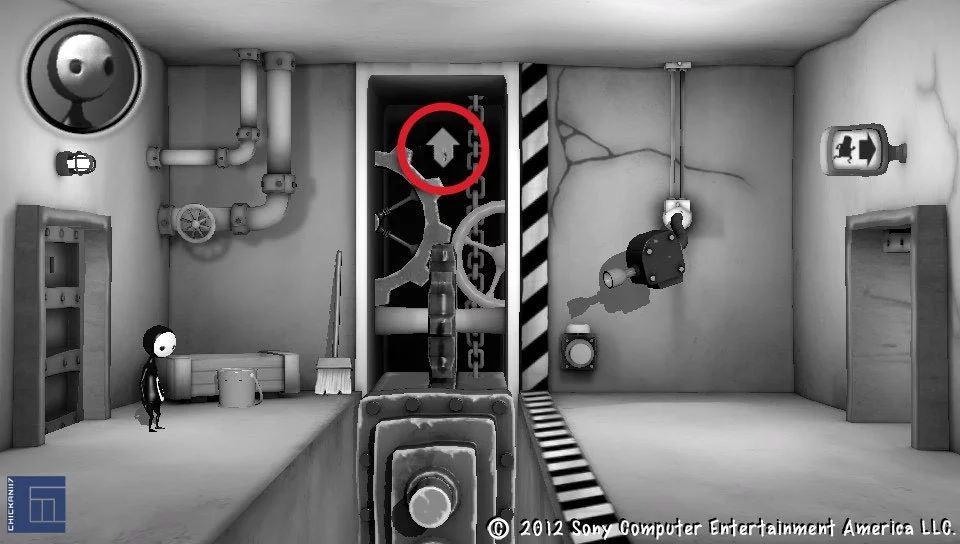
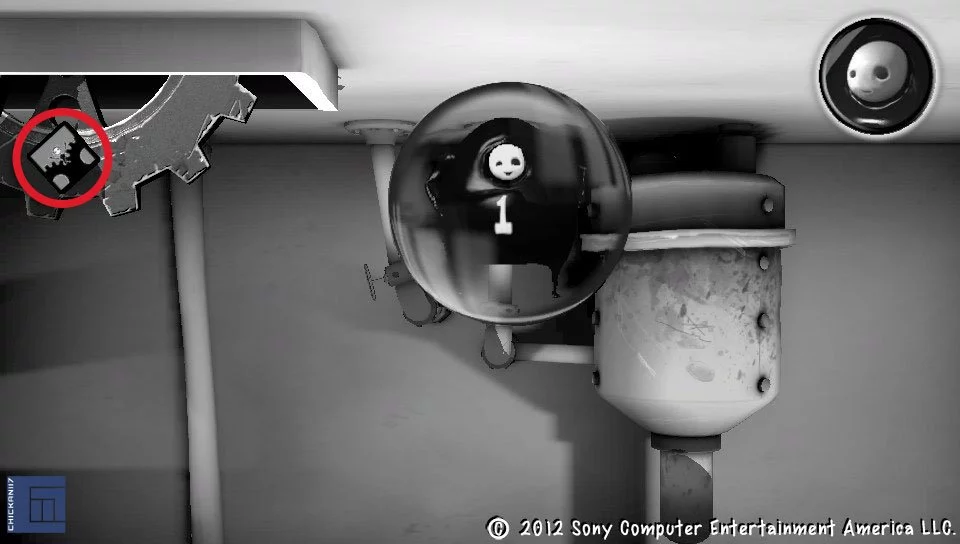
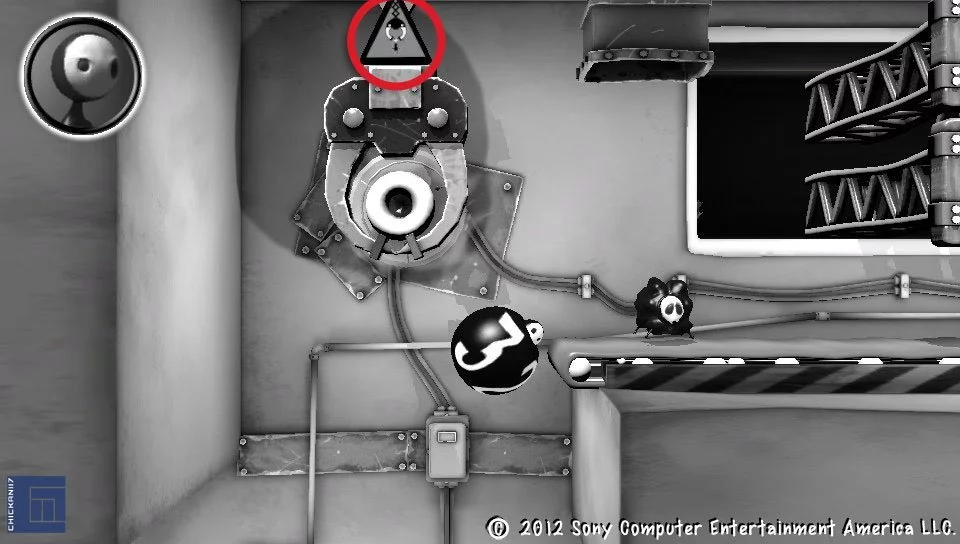
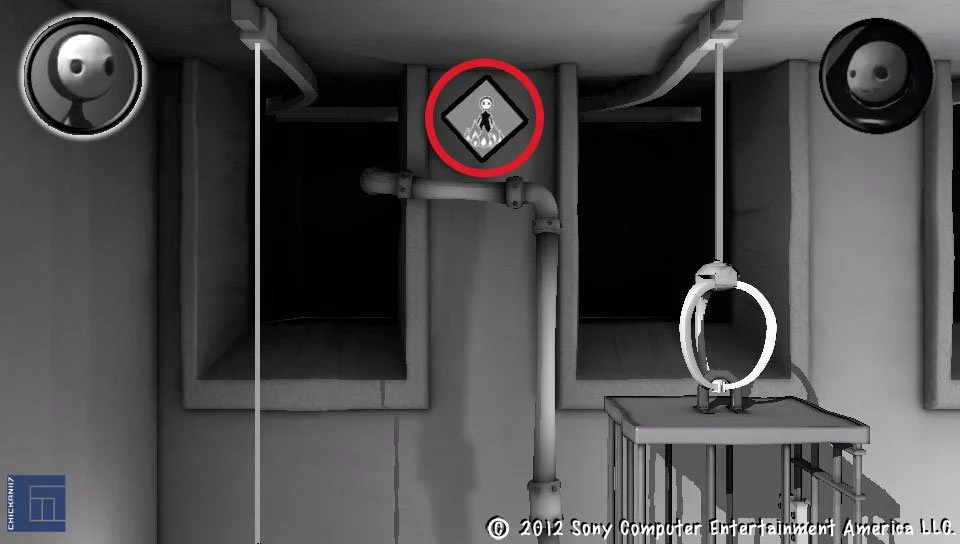
Sign 2 – Level 6 – Mind the Gap
In the centre of the screen just above the gears that move the platform.
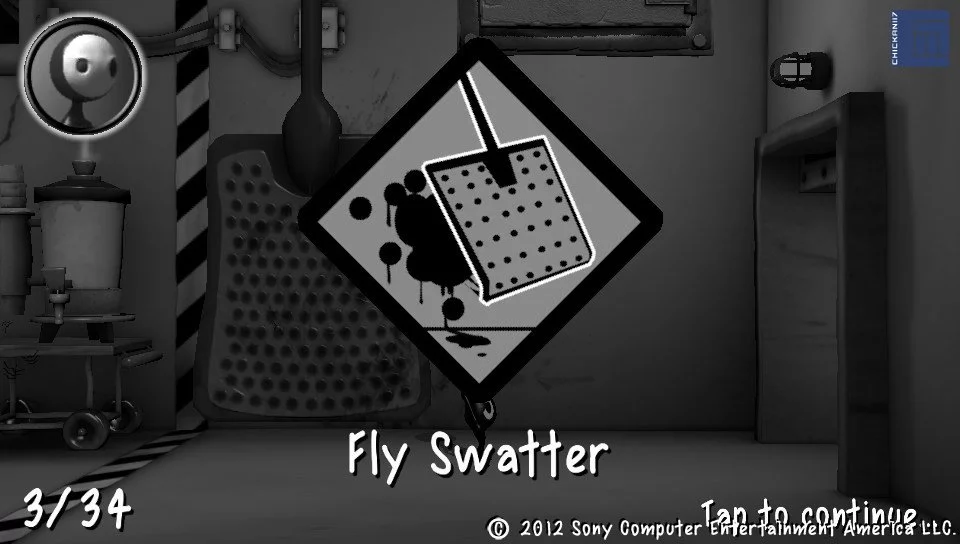
Sign 3 – Level 7 – Fly By
After the fly swatter hits the wall you’ll see the sign on the rear side.

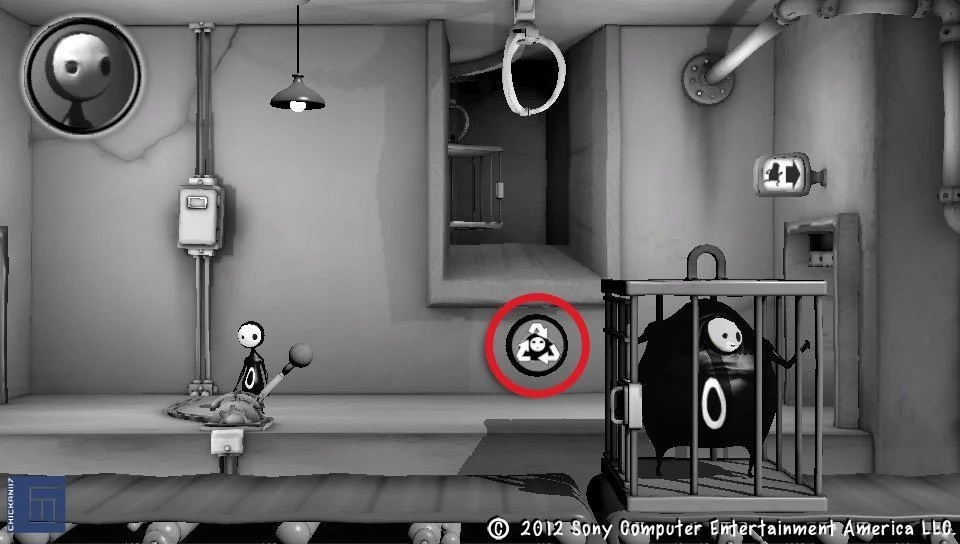
Sign 4 – Level 8 – Kiln Me Softly
Once you’ve pushed Laarg’s cage off ledge you’ll see it on the wall behind where he was
Sign 5 – Level 10 – Brickin’ It
After you run across the rotating walkway pan the camera to the left and you’ll see it on the back wall. You can also just pan across to it from the start of the level if you like… I just like making Lil run.
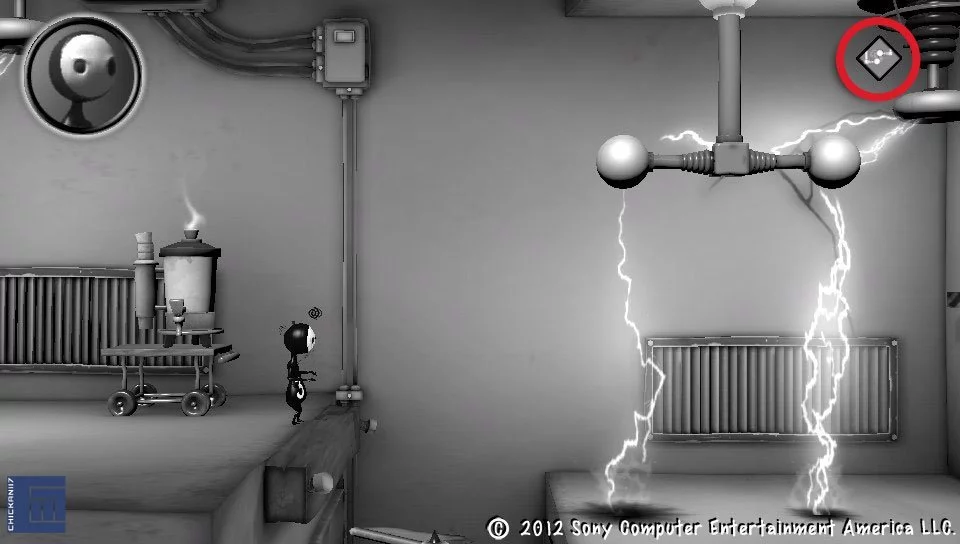
Sign 6 – Level 12 – The Grey Mile
It’s on the wall behind the panel you knock over to safely cross the electrified floor.
Sign 7 – Level 14 – Break on Through
This is a tricky one. On the lower half of the level (where Lil starts) you’ll see a cardboard box sitting on some crates. Tape the back touch panel to knock it off and reveal the sign.
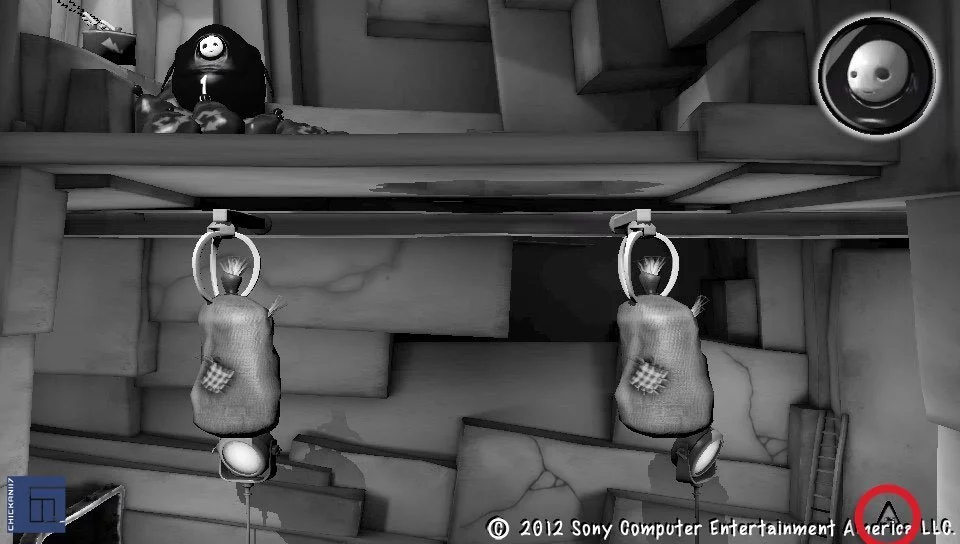
Sign 8 – Level 15 – Make Your Bed
It’s on the lower level behind the mattress you knock over to create a safe landing spot for the guys.
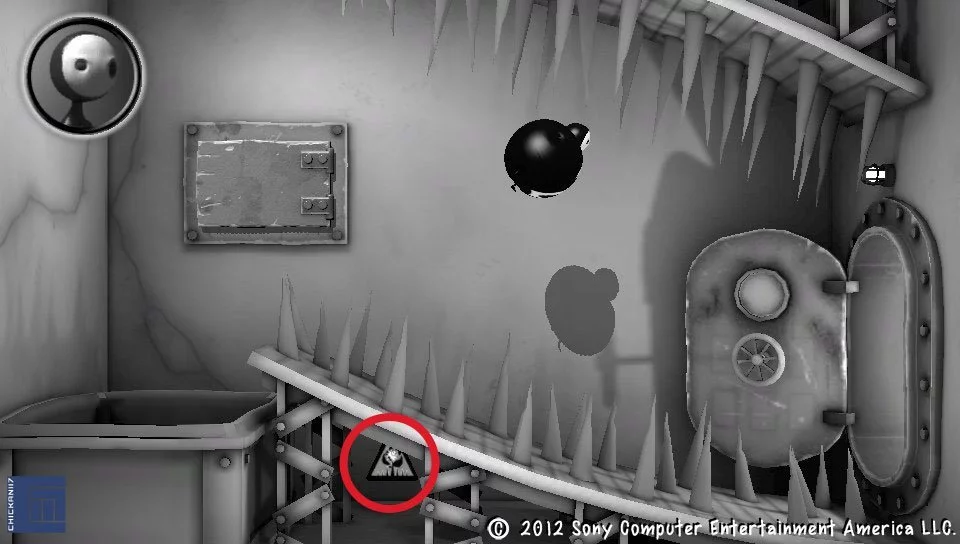
Sign 9 – Level 20 – Suck on this
It’s in the top right corner of the room. Very hard to miss.
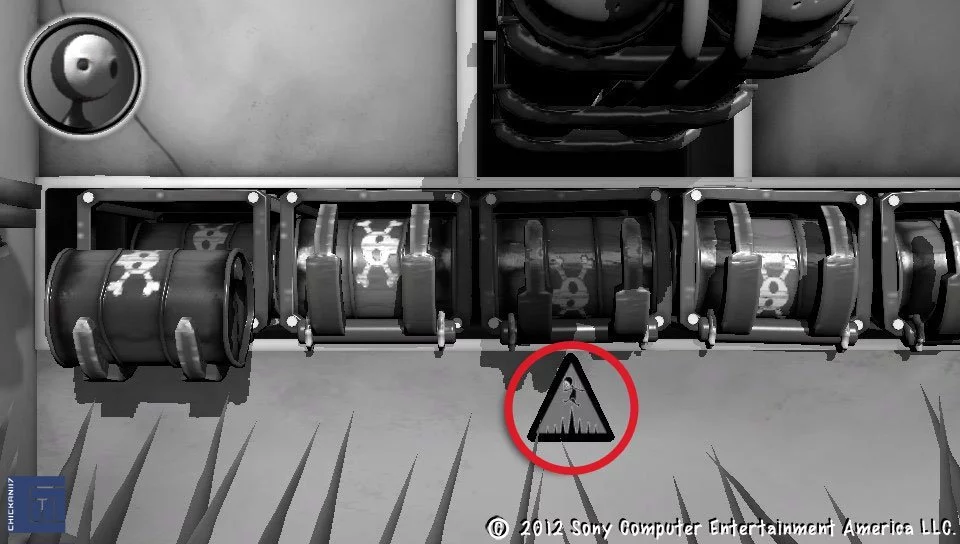
Sign 10 – Level 23 – Weight to Die
Stand on the button in the middle of the room and some barrels will be carried overhead. The sign is stuck to the fourth barrel. Make sure you get it and move though as the fifth is leaking toxic nastiness.
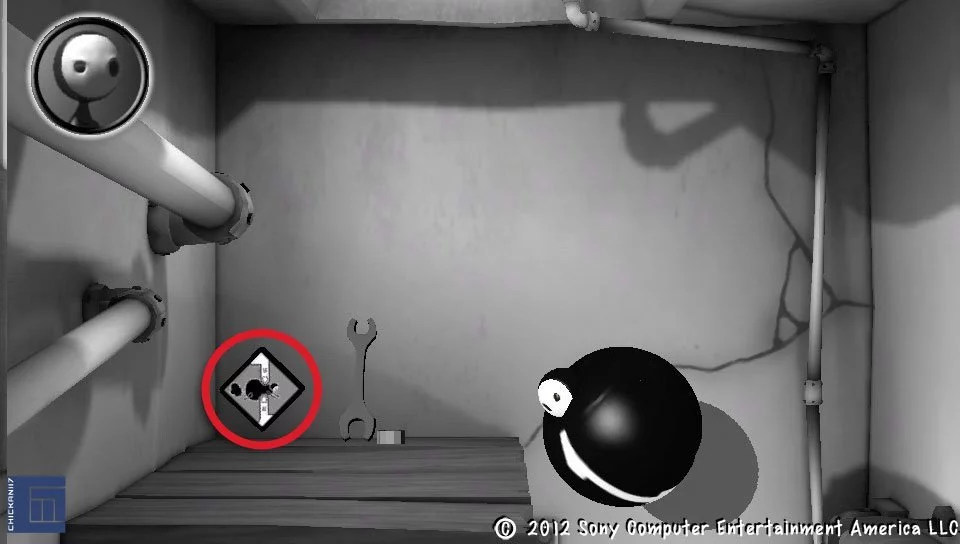
Sign 11 – Level 24 – Tilt me Baby
It’s at the top of the shaft on a ledge on the left beside a spanner.
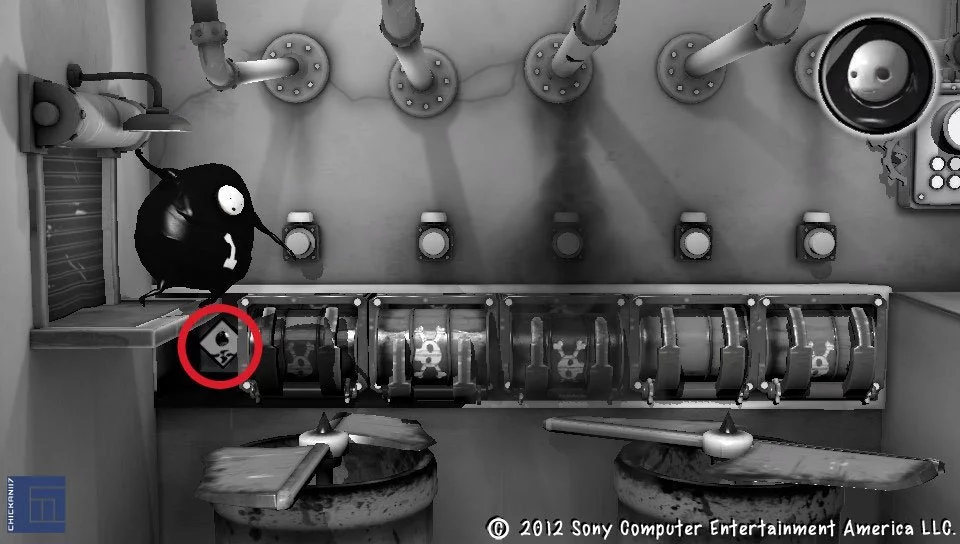
Sign 12 – Level 29 – Smoking Kills
As soon as the level starts look just under where Laarg is balancing. It’s just to the left of the barrels.
Sign 13 – Level 32 – Fall Guys
From the start of the level push the third platform out and the sign will appear. It’s the only platform that doesn’t have a barrel.
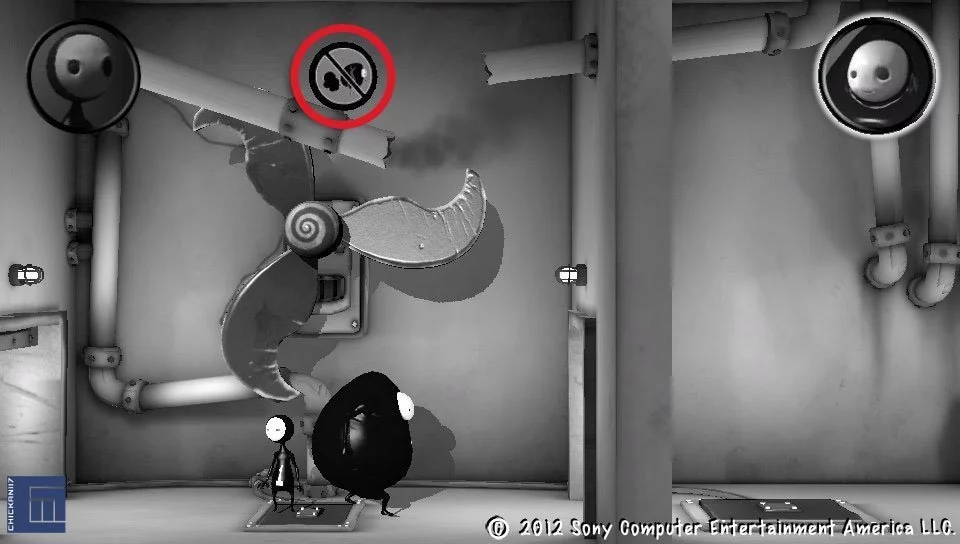
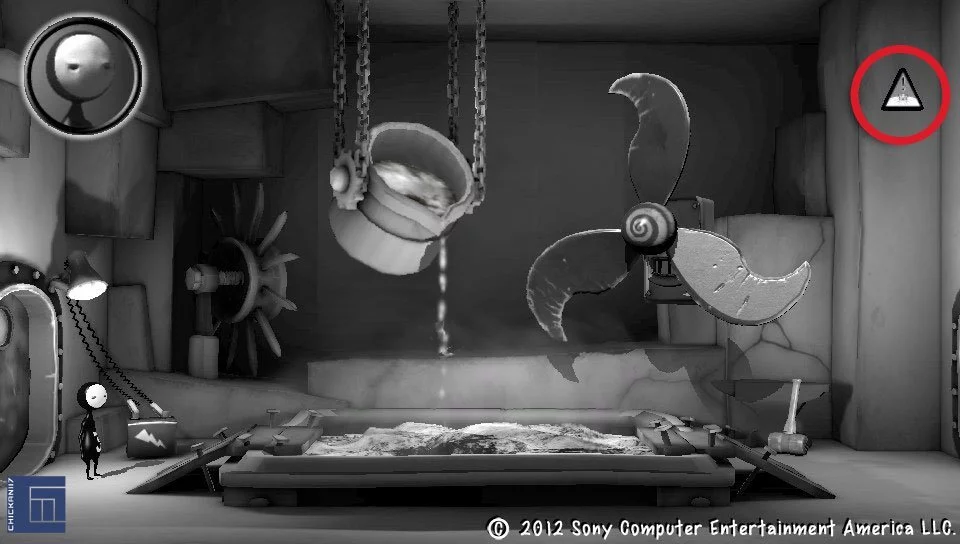
Sign 14 – Level 33 – Gag Pipes
It’s at the top of the centre room with all the smoke. If you’re having trouble seeing it use the fan to clear away all the smoke first.
Sign 15 – Level 34 – Easy Does It
It’s on the right hand side of ground level, right near Laarg’s exit.
Sign 16 – Level 35 – Falling For You
(can also be collected in the Floater level in the Dump Section)
One floor down from where you start there’s a large sack leaning against the wall. Knock it over and the sign is on the wall behind it.
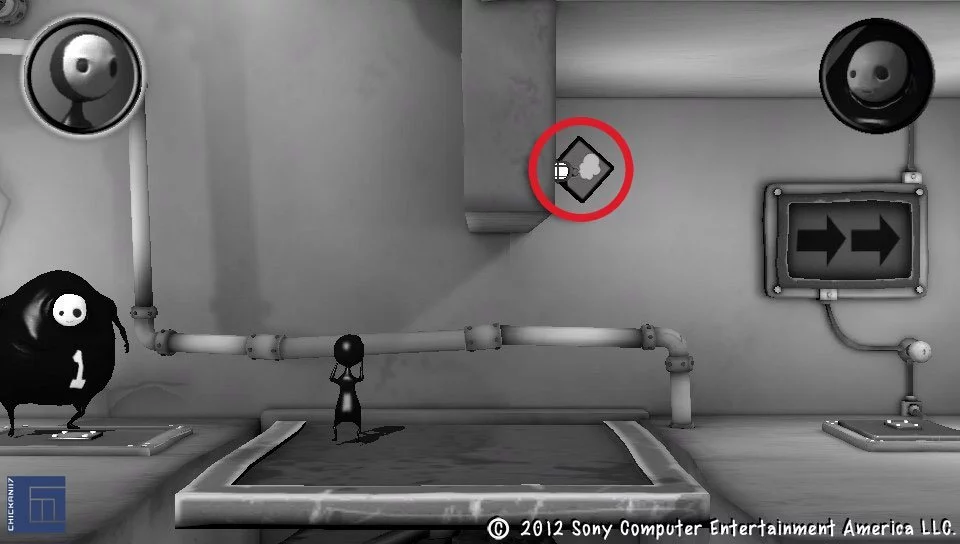
Sign 17 – Level 36 – Final Elevation
Use the fan to push the platform all the way to the top (preferably with a minion riding on it… SPLAT!). Now pan the camera down to the bottom of the screen and you’ll see the sign on the structure supporting the platform.
Sign 18 – Level 40 – Pop top
Just before the end of the level there are five barrels above a bunch of spikes. The sign is just underneath the third (middle) one. Easiest to scroll up and grab this one before floating through the level IMO.
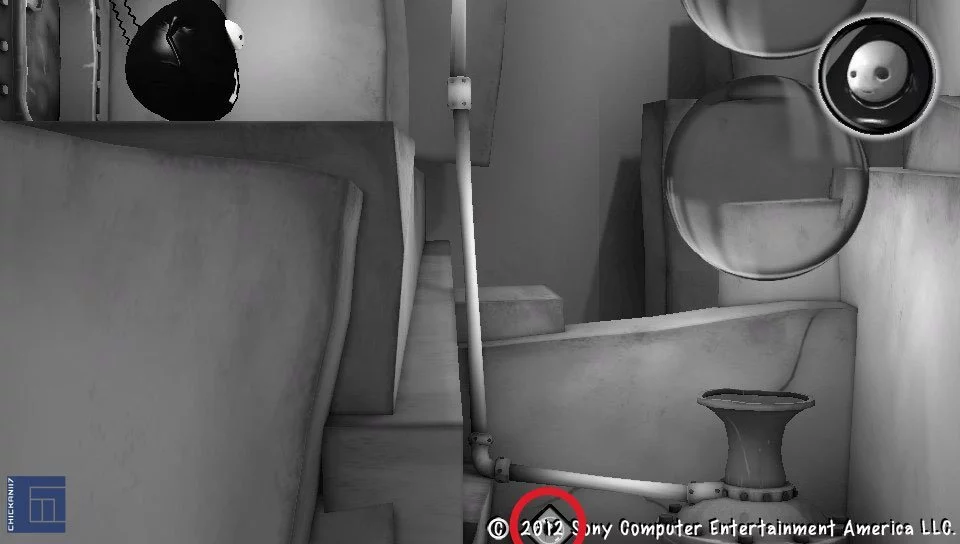
Sign 19 – Level 42 – Body Bag
Pan the camera down and to the right and you’ll see this tiny sign in the bottom corner of the screen. My apologies for the Sony watermark obscuring the sign.
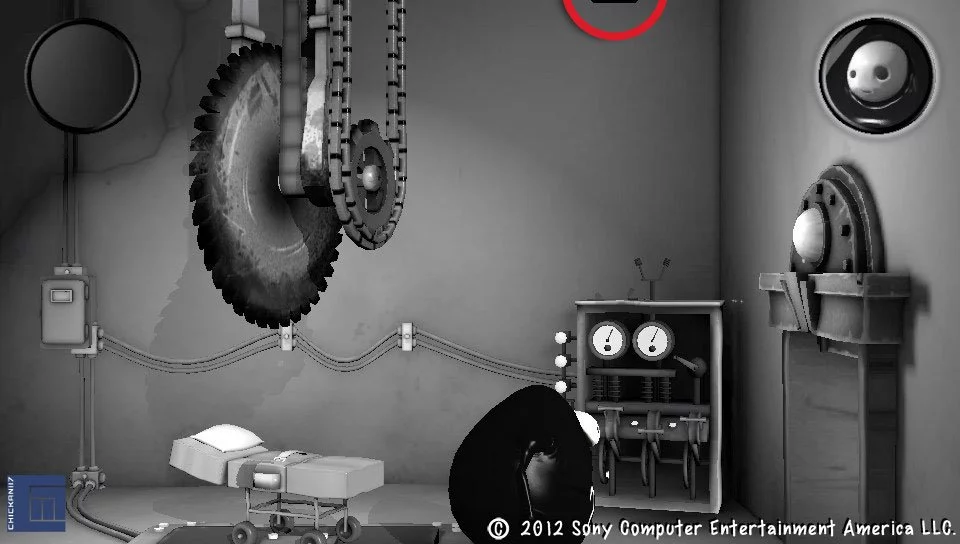
Sign 20 – Level 44 – Him See Hammer
Once the hammer falls down pan the camera up and you’ll see it on the wall (when you first enter the room the hammer is obscuring it)

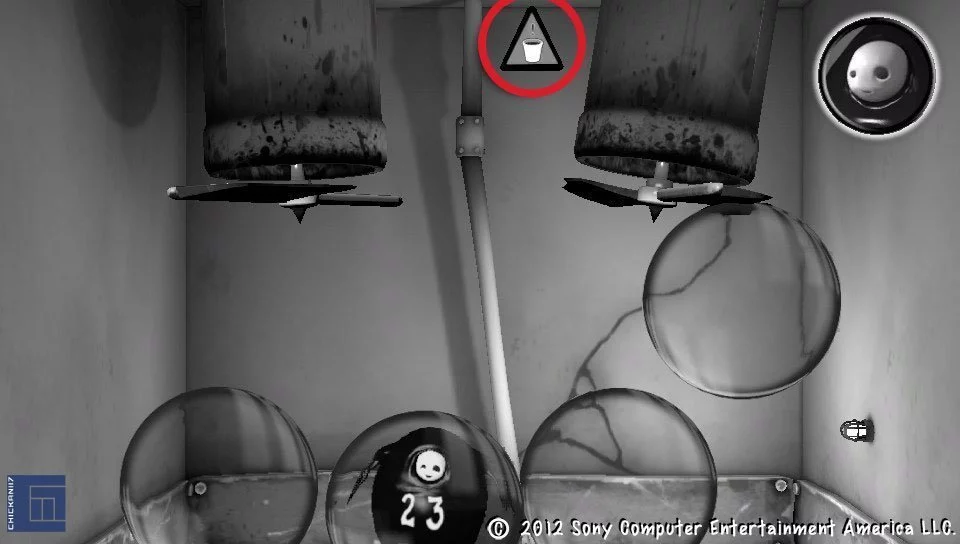
Sign 21 – Level 45 – Bubble Butt
Pan the camera down and it’s just left of the bubble generator
Sign 22 – Level 46 – Bubble and Squeak
At the very top of the first shaft there are two gears in the ceiling. The sign is stuck on the right hand gear. If you scroll up as soon as the level starts you have just enough time to grab it before it disappears into the roof. If you miss it you’ll just have to wait for it to come around again.
Sign 23 – Level 50 – La Vie En Rose
Easy to miss it’s just to the right of where you enter the level, below the spikes.
Sign 24 – Level 54 – One for my Homies
At the top right hand side of the screen.
Sign 25 – Level 60 – Fatally Fantastic
Use the fan to push the platform all the way to the top. You’ll see the sign on the structure supporting the platform.

Sign 26 – Level 66 – Hot Coffee
It’s in the top right corner of the far right side of the level.
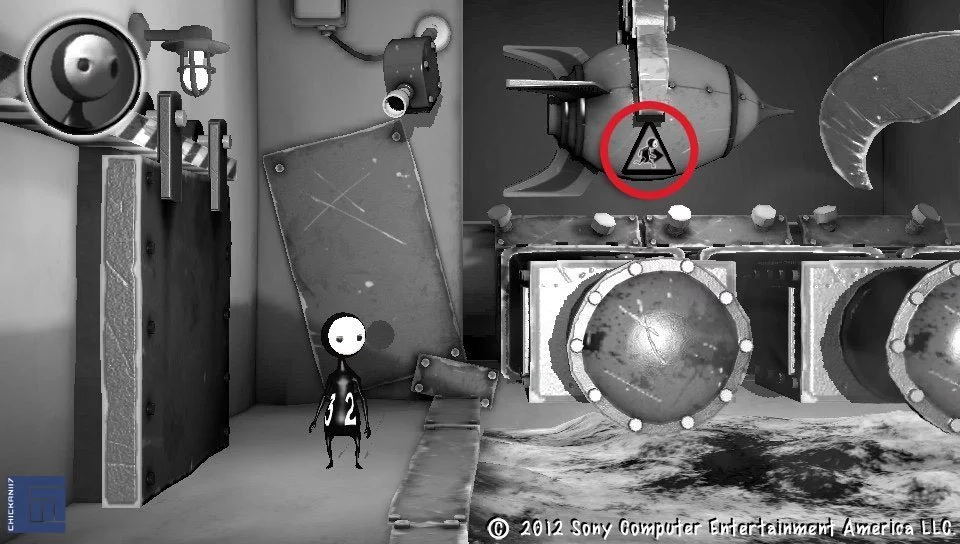
Sign 27 – Level 59 – Deep Fried
Once the level starts just hang back for a few seconds and you’ll see a claw carrying a rocket go by in the background. The sign is stuck on the side of it.
Sign 28 – Level 70 – Beware the Claw
Ah the level that cost me my challenge mode victory :( The sign is stuck on the claw coming down from the roof at the top of the first shaft.
Sign 29 – Level 74 – Made from Girders
Once you’ve completed the tasks to extend the platform for Laarg to cross you’ll see it below in the gap. You can also see the edge of the sign if you pan down at the start of the level.
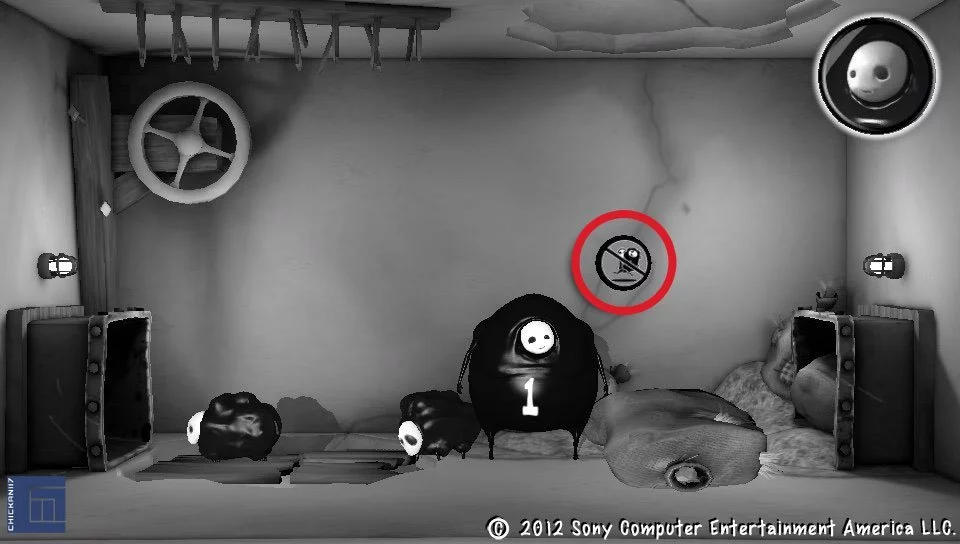
Workshop Section 2
![]() 1 Sign
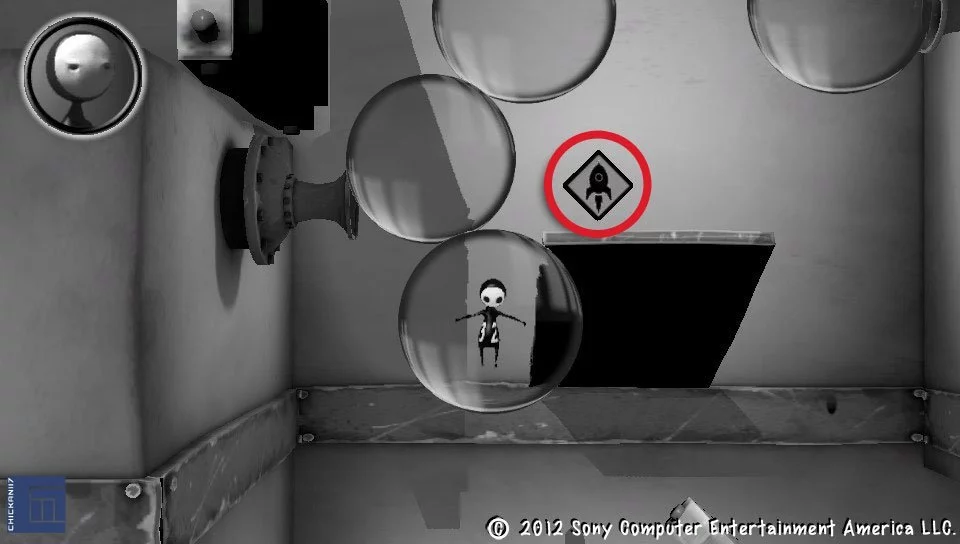
1 Sign
Sign 30 – Level 78 – Rocket Man
Approximately 1/3 of the way up the level you’ll see this one on the wall
That’s all you need for the trophy to pop. 30 signs in 78 levels…. wait a minute… didn’t this game boast over 80 levels of wacky goodness? They must have counted the cutscenes as a level because this game only had 78 (pre DLC)
So there you have it… all done.
Or are you? If you’re a completionist and want the four signs they put into the DLC then read on as I’ve done up some pretty pictures for those too!
Sign 1 – Level 1 – Prisoner Processing
Once the level begins pan up and you’ll see it between two gaps on the back wall.
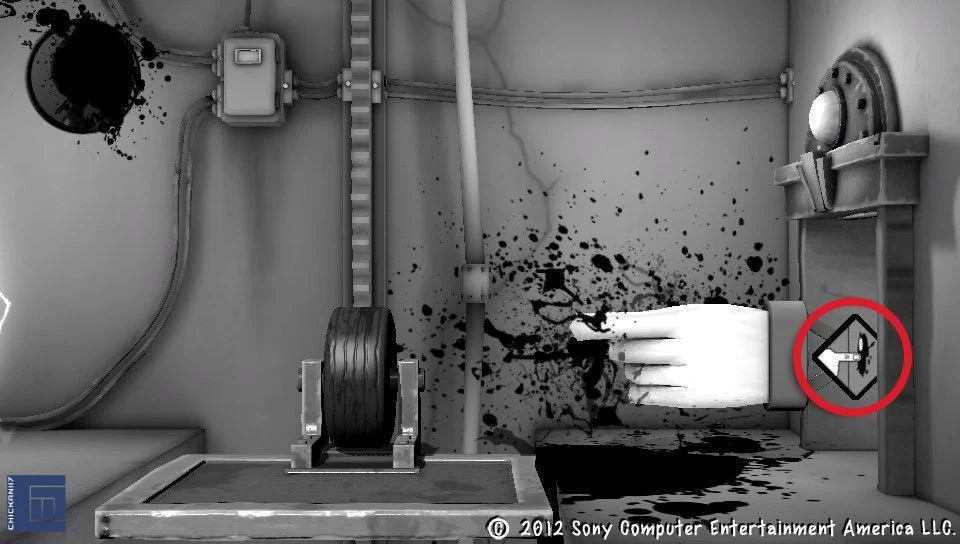
Sign 2 – Level 9 – Death Trap
The door on the bottom right side of the level is opened by standing on a switch. When you do this a hand trap pops out and splats you. Be quick as the sign is stuck to the mechanisem pushing the hand and will only be visible for a second.
Sign 3 – Level 16 – Bubble Spank
Pan the camera all the way to the top of the shaft and you’ll see it on the wall between the two fans.
Sign 4 – Level 18 – Would You Like to Play a Game?
This one is terrible! At the top right side of the screen you’ll see a small black line. This is the edge of an almost impossible to see sign!
And there you have it. If you liked this guide please donate generously to my charity which is aimed at finding a cure for unicorism in ponies!
This article may contain affiliate links, meaning we could earn a small commission if you click-through and make a purchase. Stevivor is an independent outlet and our journalism is in no way influenced by any advertiser or commercial initiative.
